Parts
Part 1: Decoding the Gears of War 2 graphical settings.
Part 2: Writing the code to read and write the settings.
Part 4: Modding the Gears of War 2 executable to run in 60 FPS.
Introduction
In part 2 I showed you how you can read and write the graphical (and game-related) settings of the Xbox 360 title Gears of War 2. This ended with a nice little CLI tool written in Go that can be used to decode and encode the settings. So lets have a look at what damage we can do, but first a short look at why all these 360 and PS3-era games had their FOV set so low.
The PS3 and Xbox 360 were the first consoles that could realistically render a game in HD. While being a step forward in terms of fidelity, the higher resolutions required much more processing power to achieve a playable framerate. In the industry-wide push for HD graphics a lot of compromises had to be made to make games look great while actually still be games and not interactive slideshows. Most games that attempted to sell themselves on visuals targeted 30 FPS, which was an OK compromise if the game could actually sustain a locked 30. There were games that ran at 60 FPS, but this was by no means the rule.
This push for graphical fidelity, combined with the lackluster processing power of the PS3 and Xbox 360, meant that developers had to sacrifice something to get 30 FPS. Remember that the 360 had 512 MB of shared RAM and a 3-core PowerPC CPU and the entire game + graphics had to fit within the 512 MB. I cannot imagine what hacks the developers had to come up with to make this work, but I can imagine it requiring an intimate knowledge of the console. There were many impressive games, but the hardware limitation was real and no matter how you compress the data, you could only fit a finite amount of textures and models within your 33ms frame time. Rendering less stuff (in terms of processing power) on the screen can be achieved in a couple of ways, some of which include:
- Lower resolution textures
- Fewer models, decals, textures etc.
- Fewer shader effects
- Shorter draw distance
- Shallower FOV
Lowering the resolution of the textures obviously allows you to fit more textures on screen at once. The same goes for models and such. Less advanced or fewer effects will have a positive impact on frame timer. A short draw distance is a classic trick and is usually implemented with a so-called level of detail bias (often written: LOD bias), which is just the distance away from the camera at which the level of detail is reduced. And last but not least you can decrease the FOV which effectively reduces the amount of stuff you need to render.
When we consider that a game like Gears of War 2 was a flagship triple-A title and it had to look like the next generation, we can see that the developer’s hands were tied. The only way to make the game look HD was to either decrease the draw distance, the resolution or the FOV. Decreasing the already paltry 720p resolution would not have been received well by the target demographic, leaving them basically no choice but to reduce the FOV.
Let’s try to increase the FOV
In part 2 I showed a small CLI tool that can read and write Gears of War 2 settings files, now we get to use it.
Using the techniques described in part 2 you need to get hold of the Coalesced_int.bin file from your game. I got mine through FTP, but you can get it from the game DVD if you have an hacked Xbox 360, which I assume anyone who attempts this will have.
The first thing to do is to unpack the settings using the CLI tool:
./coalesced-inifier unpack -i /path/to/Coalesced_int.bin -o my-output-dir -g gow2
This gives you a folder structure of ini files and we are looking for something that has FOV in the name. So we use grep:
$ cd my-output-dir
$ grep -ri fov

[...]
GearGame/Config/GearCamera.ini:FOVAngle = 70
GearGame/Config/GearCamera.ini:FOVAngle = 95
GearGame/Config/GearCamera.ini:FOVAngle = 50
GearGame/Config/GearCamera.ini:FOVAngle = 70
GearGame/Config/GearCamera.ini:FOVAngle = 80
GearGame/Config/GearCamera.ini:FOVAngle = 80
[...]
This gives a whopping 158 lines, which is a tad too many to consider, but the ones in GearGame/Config/GearCamera.ini sound like a good place to look. If we grep for FOVAngle with -C 10 in the specific file, we get (excerpt):
$ grep -C FOVAngle GearGame/Config/GearCamera.ini

[...]

[GearGame.GameplayCam_Default]
FOVAngle = 80

[...]
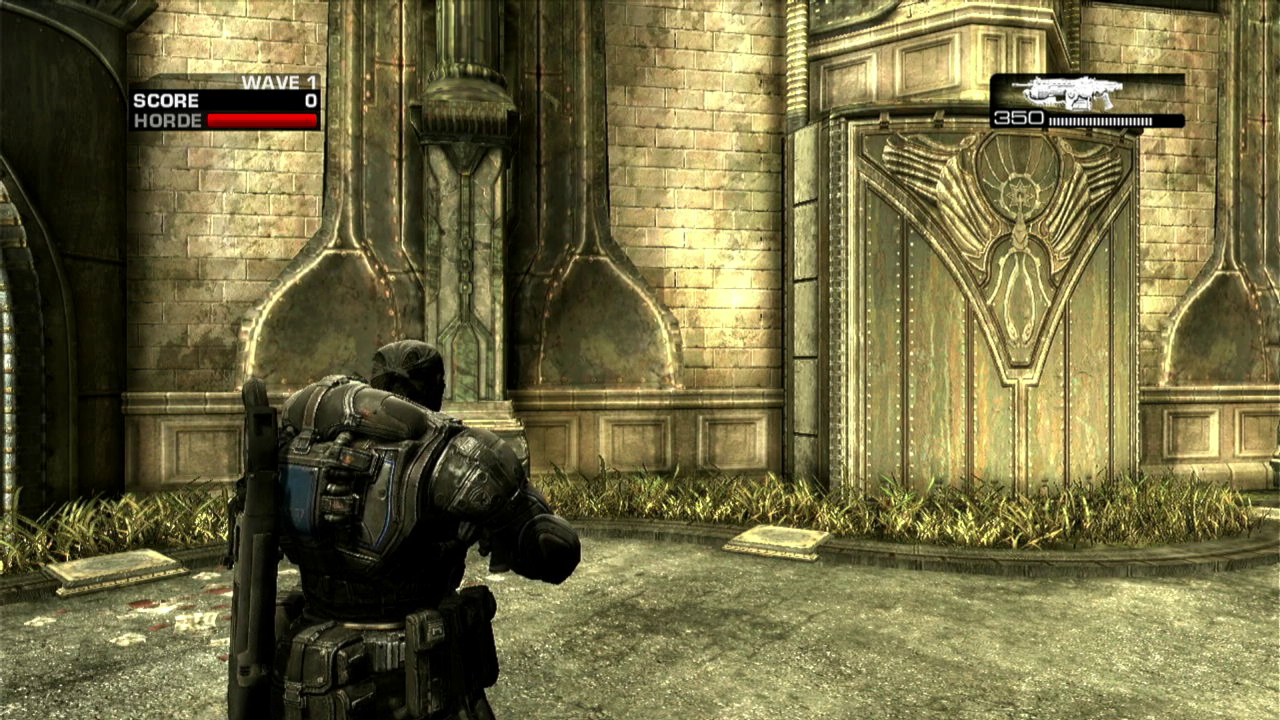
If 80 degrees is in fact the FOV you can understand why I chose to go down this multi-day path of yak shaving galore. It is just too low. Let’s bump it to something insane like 130 and pack the settings and transfer it to the console. The project README covers how to re-pack them. I made the change, re-packed the files and FTPed them to the console. It seems the setting we found was correct, the FOV seems to be 130:
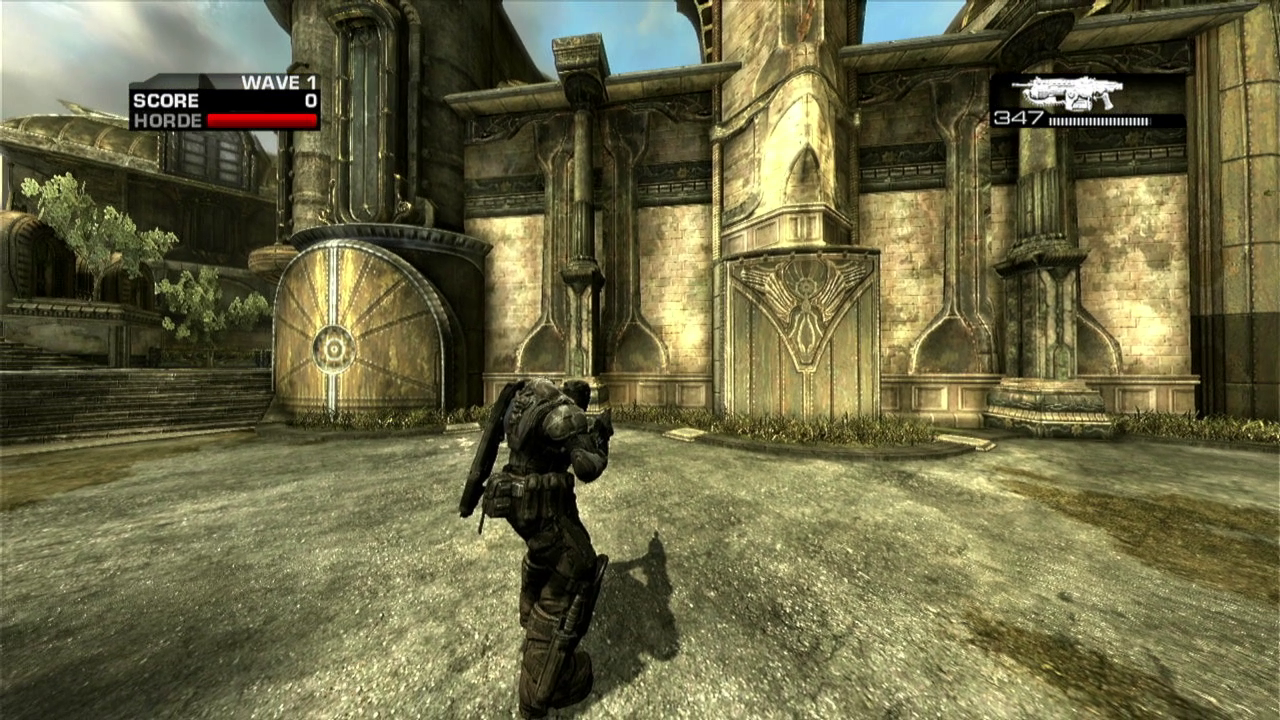
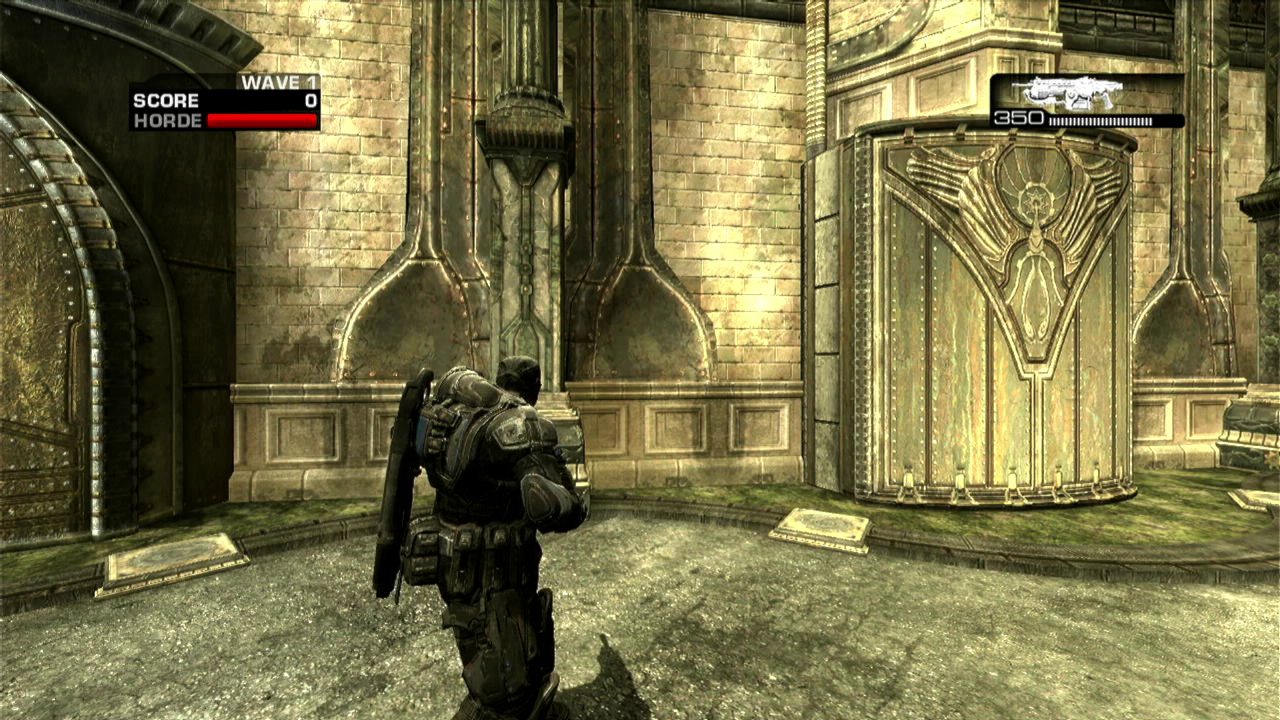
This is, of course, a tad too much on a 16:9 screen, but is a good indicator of that we are on to something here. Setting it to a more reasonable 105 yields a much saner result:

It’s awesome that it works and it is soo much nicer to look at. But, the framerate takes a noticeable hit. I have too cheap a capture card (€20 ish) to measure the framerate with any accuracy, but you can see the drops are more frequent.
Can we improve the frame times?
Let’s take a stab at it. We do have full control over the settings and we can change some of the things mentioned in the introduction. We could try removing some effects and reducing the texture resolution, which, in theory, should decrease the memory load significantly. If you ever played split screen you may have noticed a reduction in fidelity, and if you didn’t I don’t blame you, the small screen makes it hard to spot. Poking around the files I stumbled upon GearGame/Config/Xe-GearEngine.ini and it has a section called [SystemSettingsSplitScreen2], which contains changes to the settings when playing split screen (or I assume so):
[SystemSettingsSplitScreen2]
AmbientOcclusion             = False
bAllowBetterModulatedShadows = False
DecalCullDistanceScale       = 0.4
UnbatchedDecals              = False
DetailMode                   = 1
The same file contains a section [SystemSettings], which we assume is for full screen playing, so let’s try applying the split screen settings to the normal play mode. We do so by copying the values from [SystemSettingsSplitScreen2] to SystemSettings. This is left as an exercise for the reader. For reference the settings for full screen are:
AmbientOcclusion             = True
bAllowBetterModulatedShadows = True
DecalCullDistanceScale       = 1.0
UnbatchedDecals              = True
DetailMode                   = 2
When we change them to the ones from [SystemSettingsSplitScreen2] we get some slightly uglier screenshots:
It is immediately obvious that our newest screenshot has a lot less stuff on screen. Upper left corner you see the missing ambient occlusion. On the ground there are no flyers littering the ground and the grass near the building has gone away, leaving us with a suspiciously well-kept patch of grass. I don’t see any difference in texture quality or detail level of Marcus Fenix’s shadow. How does it play? Surprisingly, much better. It is back to basically capped 30 FPS with no noticeable frame time issues (during the short amount of testing). There’s no need for fiddling with more settings for now.
Conclusion
This turned out to be much more fun and rewarding than I imagined it would be. The slight increase in FOV has made a huge difference in my enjoyment of the game, so much so that I simply had to write this piece. My hypothesis on why the FOV was set to a paltry 80 degrees held up: it was not possible to make AAA fidelity while maintaining a consistent framerate. Reducing the graphics settings was not an option during the time of release, as this was one of the reasons to buy an Xbox 360 over a PS3.
While exciting that this is possible it also makes me wonder what could have been. If there wasn’t the huge pressure to deliver fidelity, imagine console games with sane FOV and, dare I say it, 60 FPS?
Until next time, thanks for reading.
/J