The original Xbox holds a special place in my heart. I acquired one around the time the 360 was released and immediately fell in love with the very vast collection of apps, mods and emulators for the system. My first system had a transparent S controller which was more reasonably sized for my hands than the gigantic original controller colloquially called The Duke. I enjoyed the system for many years as an XBMC box, emulator box and for light gaming. I’ve had a bunch of Xbox consoles and a couple of them bit the dust. The subject for this post was a 1.6 softmodded fellow.
I had this particular Xbox in storage for at least a couple of years when I decided to play on it again. I connected the shitty component cables to one of my Dell U2410 monitors and to my surprise (or not really) it did not boot up correctly. After acquiring some DVD-Rs I got a bunch of recovery disks ready, but there was nothing to be done. The Xbox’s now old but kinda-shitty-when-I-got-it Maxtor hard drive, that had been used for years in my computer a decade prior, had finally given up. This being a version 1.6 I had softmodded it. I of course could not find the very important backup of the original EEPROM I never made. This meant that I effectively had a bricked softmodded console with no means of reviving it. Then the research began.
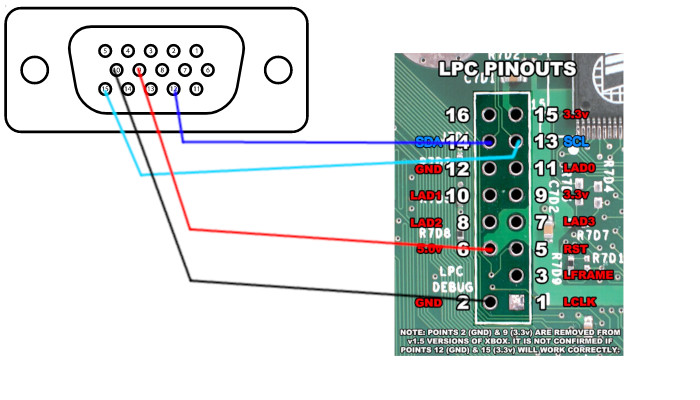
I quickly stumbled upon a guy who read an EEPROM using a Raspberry Pi, but this seemed a little excessive in terms of hardware. An EEPROM is an i2c device and booting an entire linux machine specifically to read i2c seemed like overkill even though the PiPROM project is awesome. I then remember fiddling around with the EDID on my old Lenovo T500 and a tool called i2cdump. Inside your monitor there’s a small i2c device that holds a bunch of information about what resolutions the monitor supports and the like. This can be read using fairly standard commands on a linux machine. This means that inside your VGA (DVI and HDMI have them too) port there are pins dedicated to i2c communication. The Wikipedia page on the VGA Connector has a pinout. Pin 12 and pin 15 are the ones we are interested in. These are the SDA (serial data) and SCL (serial clock) pins. Pin 10 is ground and pin 9 is +5V for powering the EEPROM.
I just wired the cables directly to the EEPROM chip, but you can use the LPC header instead. The wiring is dead simple:
| LPC | VGA |
|---|---|
| Pin 14 | Pin 12 |
| Pin 13 | Pin 15 |
| Pin 2 | Pin 10 |
| Pin 6 | Pin 9 |
The crude diagram below shows how to wire the stuff.
Now load linux on your VGA device and get a hold of i2cdetect. On Debian and Ubuntu install the i2c-tools package.
To locate your chip run:
sudo i2cdetect -y 0
Your output will be something in the lines of:
     0  1  2  3  4  5  6  7  8  9  a  b  c  d  e  f
00:          -- -- -- -- -- -- -- -- -- -- -- -- --
10: -- -- -- -- -- -- -- -- -- -- -- -- -- -- -- --
20: -- -- -- -- -- -- -- -- -- -- -- -- -- -- -- --
30: 30 31 -- -- 34 35 36 -- -- -- -- -- -- -- -- --
40: -- -- -- -- -- -- -- -- -- -- -- -- -- -- -- --
50: 50 51 52 53 -- -- -- -- -- -- -- -- -- -- -- --
60: -- -- -- -- -- -- -- -- -- -- -- -- -- -- -- --
70: -- -- -- -- -- -- -- --
Run the command before and after connecting the EEPROM to the VGA cable, if a new address shows up in the output of i2cdetect that is your EEPROM. For the sake of argument let’s say 0x54 of i2c device 0 is the address we want to dump.
Dumping the actual contents can be done using i2cdump but you will need to reconstruct the file one i2c read command at a time (don’t). You should instead use the eeprog tool written by Stefano Barbato to simplify the process. It isn’t in the Debian repos but is easily obtained from the tool’s website. Download, extract and run make in the folder. If you do not have make install build-essential or your distro’s equivalent.
Once you have eeprog installed dumping the firmware is done by simply running:
sudo ./eeprog /dev/i2c-0 0x54 -r 0:256 > eeprom.bin
Notice that eeprog uses /dev/i2c-x for referring to the device number. This is the same number you used in the i2cdetect command. You may have a bunch of different devices that use i2c. On my Ryzen machine there are a total of 11 i2c devices. This number will vary between machines. The same tool can be used to write a new EEPROM image should you want to change regions on a box.
With my EEPROM dumped I could recover the HDD key and lock me a new old stock 320GB drive and load up EvoX on it.
WARNING: Be wary of what i2c device you write to, some laptop LCDs and monitors actually ship write-enabled EEPROMs.
Thanks for reading if you made it this far.
/J