Having an older car is a mixed bag since you can never really be certain what warning lights await when you turn the ignition. A couple of weeks ago I changed an exhaust temperature sensor which had failed in a nice, consistent fashion. When you started the car and the ambient temperature was around 15 degrees celcius or below, the glow plug light would flash. If you turned the car off and on again after around 5 minutes of driving, the error would disappear and the car would be happy. If you are familiar with thermistors and how they measure temperature, the symptoms start to make sense. A quick diagnostic revealed a sensor with no continuity when cold, and some resistance when hot. I found a cheap-ish replacement and everyone was happy.
Last week the glow plug light popped up again when I started the car. The ambient temperature was around 5 degrees celcius. The light disappeared when I turned the car off and on again. I did a scan in VCDS and got two hits:
16622/P0238/000568 - Manifold Pressure/Boost Sensor (G31): Signal too High
16497/P0113/000275 - Intake Air Temp. Sensor (G42): Signal too High
The VCDS wiki for the P0238 and P0113 codes states possible causes:
- Fuse(s) faulty
- Wiring and/or Connector(s) from/to Intake Air Temp. Sensor (G42) faulty
- Intake Air Temp. Sensor (G42) faulty
I immediately started looking for a replacement sensor and found that they are reasonably priced at around 50 euros for both. I added it to the cart but couldn’t press the buy button because something was fishy with the intermittent nature of the symptoms. After a couple of days the car went into limp mode once and a power cycle fixed it. Two sensors failing at the exact same time is highly unlikely, this led me to conclude that the culprit must be some type of signal integrity issue.
The weekend came around and I had a couple of hours to do some testing. I found the G31 and G42. They are located in the front of the engine on the intercooler pipe. See illustration below.
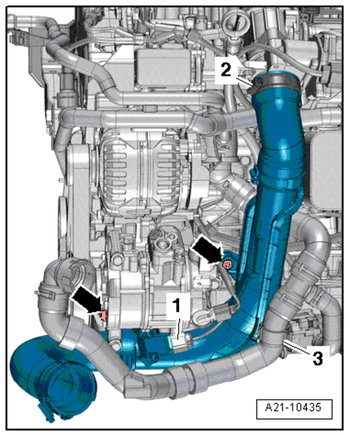
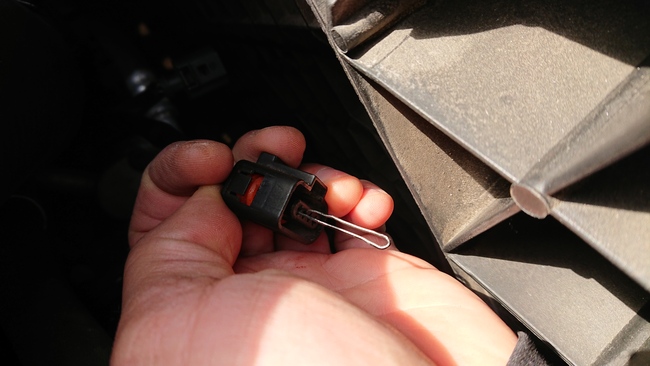
As you can see the IAT and pressure sensor is wired in the same harness. I assume the upper sensor is some sort of feedback sensor for the bottom one (it costs less than 10 euros). I was able to fit a small screwdriver into the harness clips on the sensors. The top one seemed fine, no corrosion on the contacts or damage to the wiring. The second one on the other hand looked like this:

There are only three visible wires but the plug has four terminals. My hunch was correct, the wire was shit and broke when I pulled the plug. Finding a correct harness seemed like a lot of work and I really didn’t want to drive to the VW dealer and have my intelligence insulted while they try to sell me 5 euros worth of wires for 100 euros. I had the choice to get on eBay and find a compatible harness or just rebuild the wire and call it a day. I went with the latter.
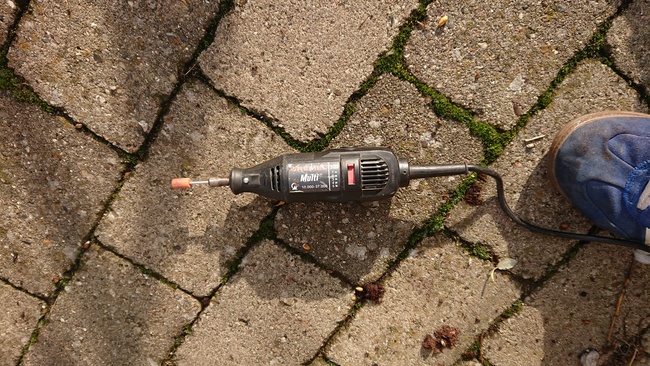
Cars have a bunch of different standardized (within the manufacturer’s line) terminals. VW is no different. The plug in question has quite small terminals and you need to slide a tiny piece of rigid metal in to get the terminal out of the plug. After some googling I could’t find any official tools, eBay had some and AliExpress did too, but my car was in limp mode without the sensor and I needed to fix it asap. I found a hairpin, which is rigid enough to do the job, but it was maybe 50% too wide and thick. I found some figures around different car forums for the tools and I needed the metal to be around 0.8mm wide. I tried filing and sanding it manually, but it was way too slow. I then pulled out my Dremel, attached a grinding stone and after around two minutes of grinding, voila! - a perfectly functioning terminal removal tool.


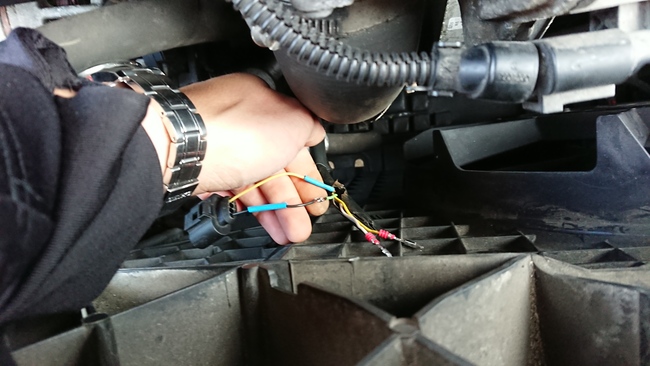
I then plugged it into the plug and pulled the terminal out. There was some copper corrosion on the terminal which I scraped off with a screwdriver. I then tinned the terminal with some leaded solder and a whole lot of flux to remove all the impurities. For the replacement wire I used a piece of 12v wire from a broken ATX power supply, tinned it and soldered it to the terminal. The final result was a very sturdy connection that is unlikely to break in the near future. While fumbling around with the plug I broke another wire and had to do repeat the process for the next wire. The process was the same for both terminals.


Now all I had to do was to solder the new wires to the old ones. I cut some of the heat-resistant plastic and removed the insulation on the original wire. The copper was slightly matte and needed some cleaning before the solder would bind properly. I cleaned the wires and tinned them. I then put in some shrinkwrap that can handle the temperatures in the engine compartment. It was a cold day and I had to increase the temperature on the iron to 340C instad of my usual 280.
After plugging the wire in and clearing the old DTCs the ECU stopped bitching about the sensor. It has been a couple of weeks now and there haven’t been any issues with the sensor. If you are uncomfortable with soldering in the tight space that is an engine compartment, you can get some crimpable wire terminals for very little money in your local hardware store/store that sells car parts. Your local mechanic/electrician can probably fix it in less than an hour if you have located the broken wire.
/J